Surface Engineering by Expanded Austenite
Micro-Hardness Testing
The purpose of the low temperature carburising processes is to increase the hardness of the alloys via case hardening. This is achieved by diffusion of carbon atoms within the matrix. However to confirm the strength of the diffusion, the hardness of the materials had to be measured through destructive micro-hardness testing. This was carried out on both the surface and the cross section of the samples.
The work of this investigation produces a hardness depth profile down to a depth of approximately 90 µm from the surface, giving both a comparison of the hardness between the different samples as well as a comparison of the thickness of the carbon layers between the samples.
Prior to the testing, the carburised samples had to be mounted as a cross section and plated in a nickel coating to protect the surface layer.
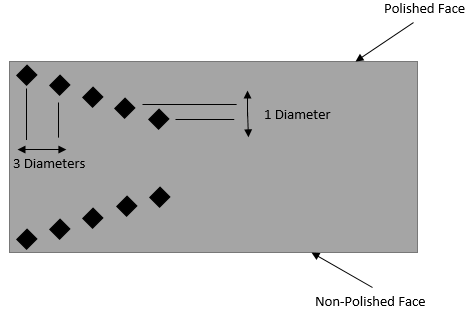
The process itself is of a repetitive nature. A diamond tip was applied to the cross section of the sample at a force of 0.05kgF for 12s. The depth of the indentation is then measured to gives a hardness reading. The location of the tip starts as close to the surface as possible and is then moved approximately one diameter towards the centre of the sample and three diameters across the sample. This is repeated 20 times for each sample, starting from both the carburised and non-carburised surface.
The readings were taken using this diagonal method as illustrated above was used as to increase the area over which the measurements were taken.
In addition micro-hardness measurement were also taken from five random locations on the polished surface of both the carburised and non-carburised samples to obtain values for the hardness of the surface. This was not done on the unpolished side as it was too rough to obtain accurate measurements.
The Vickers Hardness (HV) is calculated using the applied force ‘F’ and the average diagonal length of the diamond ‘d.’


SAMPLE
